Rowing is a great full-body workout that challenges the muscles in your legs, core, and arms. But most of us don’t have access to a boat, let alone the time to head to the lake every day!
That’s where rowing machines come in.
They’re designed to mimic the four basic movements involved in a real rowing stroke, including:
- The catch, which is the part of the stroke where the oar would hit the water. To mimic this position, you’ll be down at the front of the rowing machine with your knees bent and your upper body leaning slightly forward.
- The drive is the part of the stroke where the power is generated. You’ll push against the footplates until your legs are straight, lean back, and begin pulling the handle toward you.
- In the finish position, your legs are straight, the handle is pulled into your chest, and your torso is leaned back slightly.
- In the recovery phase, you’ll move your hands away from your body and slide down the machine’s rail back to the catch position you started in.
If you’ve ever done a deadlift, the general sequence is similar, so you’ll get the hang of it quickly.
To be successful in your first rowing workout or class, you’ll also need a general idea of how rowers work so you can set yours up properly.
The most important parts of a rowing machine are:
- The flywheel
- The damper
- The footplates
- The display
- The rail
- The seat
- The seat rollers
- The handle
- The transport wheels
- The end caps
- The frame
If it sounds like a lot, don’t worry — below, you’ll learn what each component does. Plus, I’ll give you tips on how to adjust the resistance, get strapped into the footplates, understand the data shown on the display, and more so you can get the most out of your workout.
I also spoke to an education director at Row House to give you expert advice on how to get started with rowing as a beginner.
Let’s take a closer look.
1. Flywheel
The first thing you’ll probably notice about your rower is the round wheel at the front, which is called a flywheel.
It’s the part of the rowing machine that creates resistance using either air, magnets, or water.
(More on this here: The different types of rowing machines)
One of the most popular indoor rowers, the Concept2, is air-based. There’s a plastic fan inside the flywheel housing that creates the resistance needed to build muscle.
The flywheel is connected to the handle by a chain or strap. Whenever you pull on the handle, the fan inside the housing spins, which generates wind and resistance.
Unlike an air rower, magnetic rowers have flywheels that are made of metal and several magnets inside the housing.
Depending on which resistance setting you choose, the magnets will get closer to or farther from the flywheel. This changes the speed of the flywheel and the level of resistance you feel when you pull back the handle.
Water rowers use a round tank filled with water (which is sometimes called a water flywheel) and a paddle to create resistance.
When you pull on the handle, the paddle spins in the water, which causes drag.
Many people say that water and air rowers simulate the experience of rowing on water better than magnetic ones, but you’ll get a great workout no matter which type of machine you use.
2. Damper
Most air-based rowing machines have a damper on the side of the flywheel that controls how much air is let into the fan.
It’s similar to a bike gear—it doesn’t directly control the resistance, but adjusting it can change how easy or hard your strokes feel.
According to Caley Crawford, education director at Row House:
“The damper is also important on a Concept2 Rower. It’s the dial on the fan. The numbers range from 1 to 10. One allows less air into the fan, making the handlebar ‘feel’ lighter. The setting of 10 opens more air into the fan, making it ‘feel’ heavier.”
She went on to say that it’s important to choose a setting that feels good for you. You don’t have to crank up the dial to get a great workout.
In fact, many Olympic rowers keep their dampers at a relatively low setting between 3 and 5 because it mimics the feeling of rowing on water.
Magnetic rowers also have a dial, but it’s a little different than the damper on an air-based machine. It directly controls the resistance by changing the location of the magnets and the speed of the flywheel.
Most water-based rowers don’t have a damper, but still allow you to change how your stroke feels by adjusting the water level in the tank.
Adding more water will make your handle feel heavier, whereas taking water out will make your strokes feel easier.
3. Footplates or straps
The footplates located at the front of the machine are where you strap in your feet.
Some footplates pivot to mimic the natural movement of your foot, which makes them more comfortable.
Footplates are usually adjustable too so they can accommodate feet of all different sizes.
The footplates on the Concept2 Rower, for example, have an adjustable heel cup with numbers ranging from one to six, with one being the lowest setting and six being the highest.
Getting this setting right is important and will help you maintain proper form and prevent injuries.
If your heel height is too low, you won’t be able to drive as much power and you could injure your lower back.
If your feet sit too high in the footplate, your stroke length will be limited and your form will suffer.
As a general rule, you should set the heel height so that the strap of the footplate sits over the ball of your foot.
In some cases, however, that may not be the best setting for you. If you’re not very flexible or your stomach gets in the way when you try to row, then you may benefit from a lower heel height.
Working with an indoor rowing instructor can help you figure out which settings suit your body best.
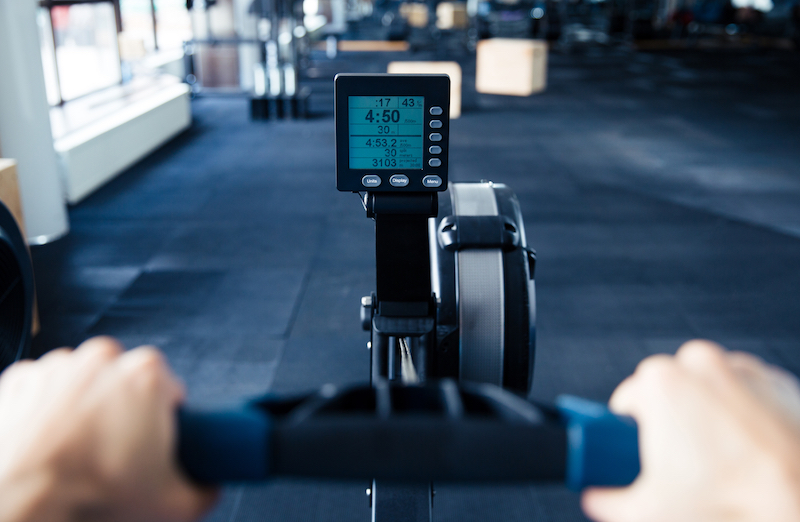
4. Display or monitor
Rowing machines have a monitor near the handle that shows you metrics like your heart rate, time, and calories burned to help you track your performance.
If you’ve never used a rower before, you’ll also see some numbers that you aren’t familiar with, like the split and stroke rate.
Crawford said:
“The ‘split’ is how long it will take you to row 500 meters at your current pace. We want that low (just like runners pacing themselves by the mile!). A lower split means your boat is moving faster.”
The split is a good measure of your intensity—the lower it is, the harder you’re working.
The stroke rate is similar to RPMs on a bicycle and tells you how many strokes you’re taking in per minute. But having a high stroke rate doesn’t necessarily mean that you’re getting a better workout.
Going back to Crawford:
“It’s a common misconception that you have to row faster back and forth (high stroke rate) in order to increase your intensity. False! You can raise your intensity simply by driving HARDER on each stroke you take without ever raising your cadence.”
This is because of the way that resistance is created on air-based machines like the Concept2 rower.
When you pull back the handle, the flywheel spins and generates wind. If you pull harder, the flywheel will spin faster and more wind will be created, which will cause you to feel more resistance.
If you have a water-based rowing machine, pulling the handle harder will also up the resistance because the paddle will spin faster, creating more drag.
But driving harder won’t increase the load on your muscles if you have a magnetic rower—you’ll need to put it on a higher resistance setting manually by adjusting the dial.
5. Rail
The rail is the metal beam that the seat moves across.
It’s usually made out of steel or aluminum.
Aluminum rails are lighter and usually provide a smoother stroke, so many people prefer them.
Another thing to note about rails is that they can be level with the ground or at an angle. Angled rails usually provide more resistance than flat ones.
6. Seat
There are a few different types of rowing machine seat:
- padded
- molded
- contoured
- and flat.
There isn’t one type that’s the best. It really depends on your body and what you find comfortable.
If you’re using a machine at the gym and don’t like the seat, you have a few options. You can put a folded towel on it to provide some extra cushion, for example.
If you don’t mind spending a little money, invest in a seat cover or get a pair of padded rowing shorts.
Maintaining proper form can also help prevent discomfort.
If sitting on the seat hurts, you may be leaning too far back at the end of each stroke, increasing the pressure on your tailbone. Sliding forward an inch or two could relieve the pain.
Make sure you check the position of your foot straps too.
If your feet are sitting too low, the back of your thighs could be pushing up against the seat and decreasing circulation to your backside. Move your feet a little higher in the straps and see if things improve.
7. Seat rollers
Seat rollers are wheels that allow the seat to move up and down the rail smoothly.
If the seat on your home rower starts feeling wobbly, adjusting the seat rollers or installing an extra pair may help.
8. Handle
The handle is what you grab onto and pull for the duration of your workout, so it’s important that it feels comfortable.
Most handles are either made of wood or plastic and have rubber or foam grips.
Handles that are well-padded and have slight bend tend to be the most ergonomic and comfortable because they allow for a natural hand and arm position.
If your handle doesn’t have a lot of padding or you want to prevent calluses from forming where you grip it, you can always wear a pair of gloves.
Another important thing to know about the handle is how to hold it.
Your hands should go on opposite sides of the handle and stay shoulder-width apart. Your thumbs should also be tucked loosely under the handle.
Make sure not to grip onto the handle too tightly, as this can put extra stress on the muscles in your forearms.
You also shouldn’t let go of the handle abruptly because it could hit the display and damage it!
Either place it in the handle hook or against the flywheel carefully.
9. Transport wheels
Most rowing machines have wheels on the bottom called transport wheels.
They make it easier to move your home rower around and store it when it’s not in use.
Most models can roll easily from room to room if you lift one end of the machine.
10. End caps
Rowers have several round or square end caps where the machine meets the floor to stabilize it and keep it from rocking back and forth during intense workouts.
They’re usually adjustable, which can help you keep your rowing machine level even if the ground is slightly uneven.
They’ll also protect the floor from scratches if you need to move your rower.
11. Frame
The frame is the structure of the rowing machine and is either made of steel, aluminum, or wood depending on the model.
Magnetic and air rowers are usually made of metal while water rowers can be made of either metal or wood.
Some frames are foldable or break into pieces, which makes them easier to store.
Wrapping up
Rowing machines have a lot of moving parts, and the stroke can be hard to get a hang of.
So don’t get discouraged if you’re not a rowing master on the first try! And don’t be intimidated by the machine.
Put in the effort up front to learn the different parts and components of the rowing machine before working out at full speed. Taking a class with an expert instructor at a studio like Row House can help speed up the learning process.
With some practice and persistence, you’ll figure things out and be able to crush your workouts.
For more on rowing, check out:
- The pros and cons of rowing machines
- What results can you expect from using a rowing machine?
- The best rowing machine brands
Hope this helps!